How Can We Help?
How to Set up PayPal Mass Payment
PayPal Mass Pay is a PayPal API that allows you to send money to multiple people. Our affiliates manager plugin offers integration with PayPal Mass Pay so you can send commission payments to multiple affiliates at the time.
Requirements
To perform PayPal Mass Payments, you will need the following:
- WP Affiliate Manager 1.3 or greater
- A PayPal Premier or Business account
- PayPal Mass Pay API enabled in your PayPal merchant account (contact PayPal if it’s not enabled already)
- PayPal API credentials – explained below
Step 1: Acquiring Your API Credentials
In order for the WP Affiliate Manager (WPAM) to communicate with PayPal, it needs access to your account via the PayPal API. This allows WPAM to access your account and process transactions without knowing your PayPal username and password. The credentials can be revoked at any time by you, allowing you to protect your account.
To begin, log in to your PayPal account, and go to the Summary tab.
There should be a link at the bottom left corner of the page named Seller preferences (Under Selling tools). Click on it.

On the following page, you will be presented with a list of options. Click the Update link next to API
Access.

Next, you’ll be shown the Payment API credentials page where you’ll be presented with multiple options. You’ll want to
click on Manage API credentials under NVP/SOAP API integration (Classic).

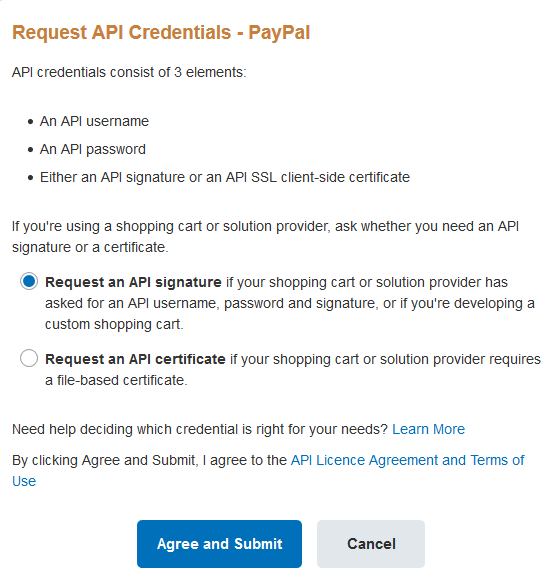
The next page will ask you whether you want an “API Signature” or an “API certificate”. WPAM
currently only supports the “API Signature” option. Select Request an API signature, and then click Agree
and Submit (Note, it may also say View API Signature if you’ve already completed the request process).
You should be brought to a page containing your personal API credentials that looks something like this:

Save these values somewhere and move on to Step 2.
Step 2: Configuring WP Affiliates Manager
WPAM has PayPal Mass Pay disabled by default. If you try to use PayPal Mass Pay, you will see this screen:

Click Save Settings and move on to Step 3.
Step 3: Making a Payment
Now that WPAM is configured for PayPal Mass Payments, you should see the following screen when you go to the PayPal Mass Pay page in the WPAM admin menu.

Click New Mass Payment and you will be shown a page that shows all of your affiliates that have selected PayPal as their preferred method of receiving money, as well as their balances.
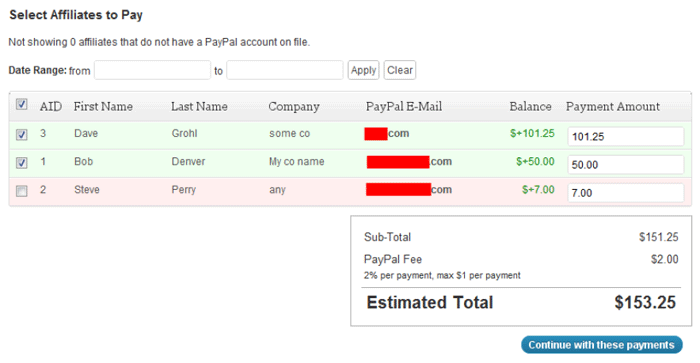
By default, only affiliates who have earned more than the minimum payment requirement will have a checkbox next to them. However, you can add a check next to any of the affiliates who have not reached the payment minimum to send them a payment if you wish.
The Payment Amount column allows you to specify the amount you wish to pay each affiliate, which defaults to the affiliate’s current standing. The totals at the bottom will update automatically when you modify the payments in the table. Once you’ve selected the payments you’d like to send, you’ll be asked to review the payments before submitting to PayPal.
Affiliates who have been marked as inactive and have an unpaid balance will be displayed in red.
As you can see above, I entered a $101.25 payment to Dave Grohl and a $50.00 payment to Bob Denver. WPAM will estimate the fees for this mass payment. This is subject to PayPal’s whims. The current formula is 2% per payment up to a maximum of $1 per payment. Additional fees may apply for international transactions and will NOT be shown here.
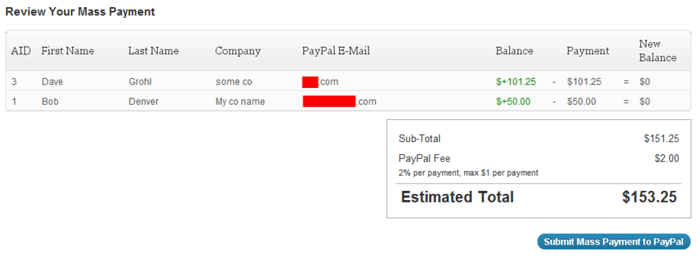
WPAM will show you the current balance of your affiliates, the payment you’re going to send them, and the expected new balance. Click Submit Mass Payment to PayPal to send this payment.
If the payment is successful, you’ll be presented with a success screen. The payments will be applied to your affiliates as a pending transaction. They will remain pending until the results of the mass payment are known. When you get to this success screen, it simply means that PayPal accepts your list of payees and will try to get the money to them. The status of each individual payment is reconciled later.

The payment has been submitted and now we wait.
Step 4: Reconciling Payments
WPAM keeps a record of every payment you’ve ever sent using PayPal Mass Pay.
Click View Previous Mass Payments to view a list of all payments processed by WPAM.

Here we can see a couple of failed payments (my API configuration was incorrect), a couple of completed payments, and the $5.00 payment we issued in this tutorial. Let’s view that by clicking View next to the $5.00 payment.

This view shows the status of the overall mass payment and all of the associated transactions. In this case, I just have one associated transaction.
How do we reconcile this payment? Well, first we need to find out if the mass payment is actually complete. We can do this by logging into our PayPal account and checking the status of the transaction.
Once we are confirmed that the payment is complete, we can go back to that page with the pending $5.00 payment to Billy Bob. Click Manually reconcile payments.

This will take you to a page where you can manually select the outcome of each transaction.

I know Billy Bob received the money (my PayPal account tells me so), so I will select Success from the dropdown menu next to his transaction. Once I have selected an outcome for all transactions, I click Reconcile Mass Payment, completing this mass payment.