How Can We Help?
How to setup Square
Getting Started
To begin using WooCommerce Square, you first need to connect your site to Square by following the steps below:
- Go to WooCommerce > Settings > Square.
- Select Connect with Square.
- Log in to your Square account. You must be the owner of the Square account to authorize WooCommerce to connect.
- Select That’s My Site – Redirect Me to return to your site.
You’re now connected to Square. You can now adjust the other plugin settings and gateway settings as needed.
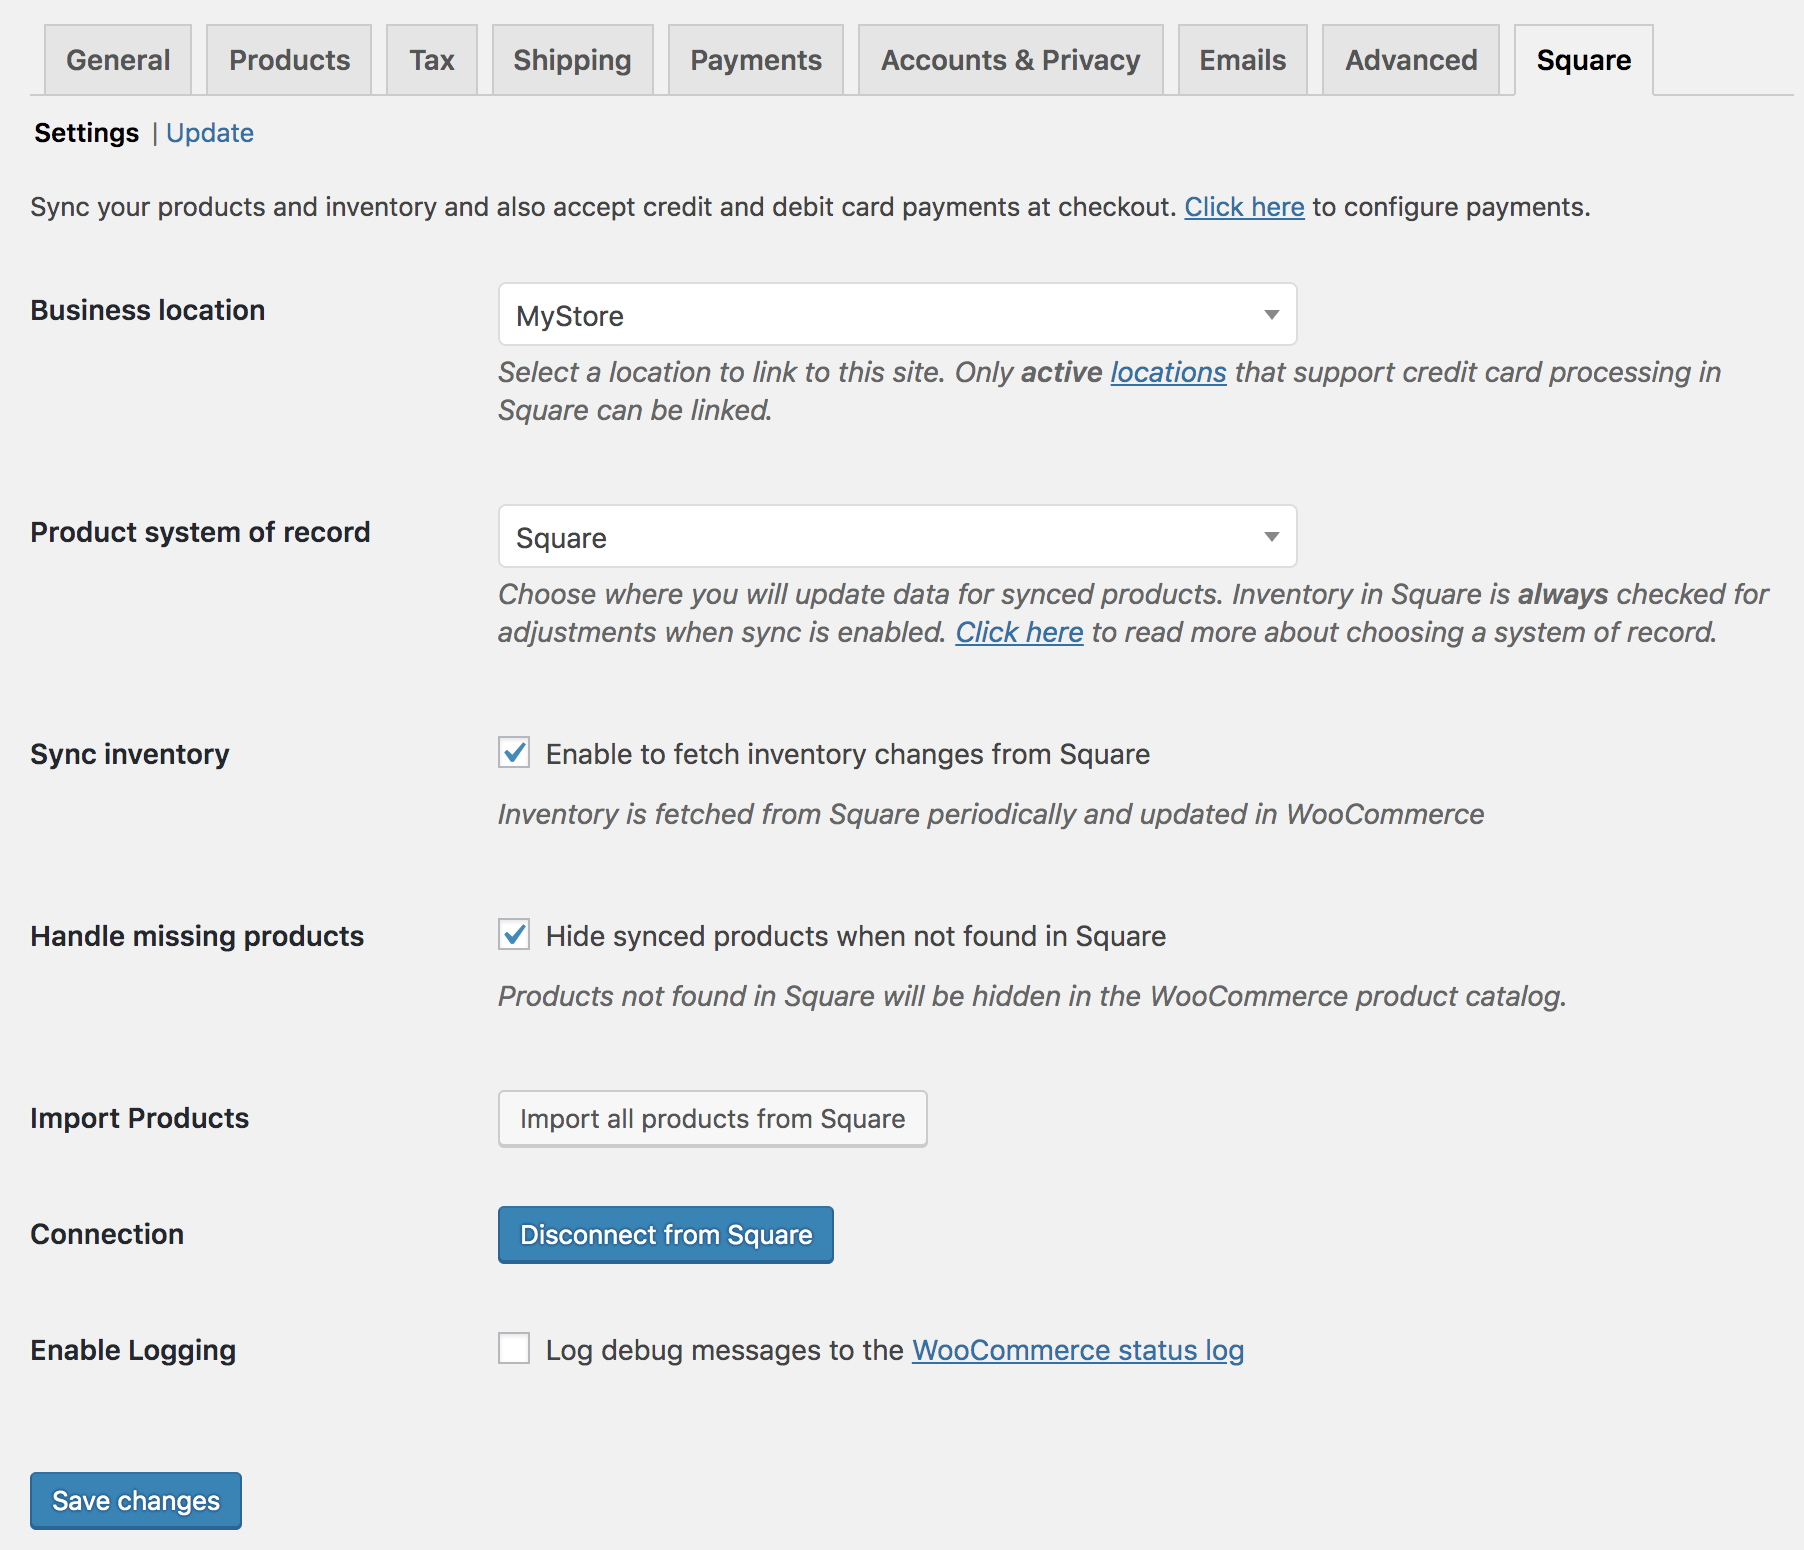
Sync Settings
From WooCommerce > Settings > Square, you can configure the following settings to determine how data sync between Square and WooCommerce:
- Business location: Select the Square location to link to this site. Locations are queried from Square and are only listed if they are Active and have Credit Card Processing enabled. To enable Credit Card Processing, you will need to go through the process of setting up your account, including verifying your identity. You can verify your identity in your Square dashboard under Setup Guide > Get Paid > Verify Your Identity.
- Product system of record: Choose where you will update data for synced products. Click here to learn more about product syncing.
- Sync inventory: Enable to sync inventory between WooCommerce and Square. When WooCommerce is your system of record, inventory changes in Woo overwrite Square inventory. When Square is your system of record, inventory cannot be changed in WooCommerce, and will always be pulled from Square. Regardless of your system of record, inventory is pulled from Square every hour to account for POS sales.
- Handle missing products: When the Product system of record is set to “Square”, enable to hide products in your WooCommerce Products list that aren’t found in Square. If disabled, no action will be taken against missing products beyond a notification in the Sync records area.
- Import Products: Import new products from Square to WooCommerce. For a Square product to be imported, it must have a unique SKU not existing in WooCommerce. As of version 2.0.0, this needs to be run each time new products are created in Square.
- Connection: Connect or disconnect your site from Square. Click here for instructions on connecting to Square.
- Enable logging: Enable to save debug messages to the WooCommerce > Status > Logs page. Please do not enable this setting unless there are issues with the plugin.
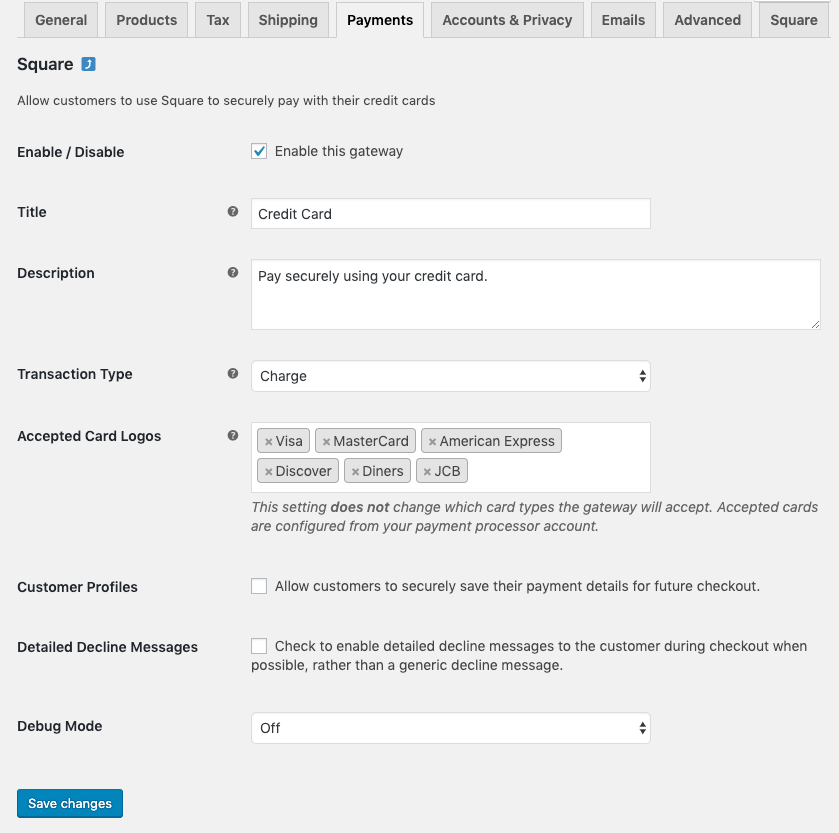
Payment Method Settings
From WooCommerce > Settings > Payment > Square, you can configure the following settings for the Square payment gateway:
- Enable / Disable: Enable to allow customers to use this gateway at checkout.
- Title: Determine how the gateway should be labeled for customers at checkout and on the Order Received page.
- Description: The text shown under the Title during checkout. Limited HTML is allowed.
- Transaction Type: Controls how transactions are submitted to Square. Select “Charge” to automatically capture payments. If you select “Authorization”, you must manually capture and settle payments on the WooCommerce orders screen or from your Square account after the transaction has been submitted (and Authorizations do not display under Square transactions). This defaults to “Charge”.Note that Square authorizations are only valid for 6 days, so they cannot be captured after this time.
- Charge Virtual-Only Orders: If Transaction Type is set to “Authorization”, enable to automatically capture charges for orders with only Virtual products. For downloadable products, this will grant immediate access to downloads.
- Capture Paid Orders: If Transaction Type is set to “Authorization”, enable to automatically capture charges when orders move to a paid status (i.e. Processing or Completed).
- Accepted Card Logos: This doesn’t determine which cards are accepted, only which card logos are shown during checkout. See the cards Square accepts.
- Customer Profiles: Customers can save their payment methods for future use at checkout. This is required for Subscriptions and Pre-Orders.
- Detailed Decline Messages: Display detailed messages to customers to provide reasoning for declines instead of a generic error message when possible.
- Debug Mode: Enable when there are problems processing transactions. You can choose to log API requests directly on the checkout page, save them to the WooCommerce > Status > Logs page, or both.
Product and Inventory Sync
You can share product and inventory between Square and WooCommerce, which helps keep each system up-to-date whether you process a transaction via Square or WooCommerce. In your Square settings, you can decide whether Square or WooCommerce should be the system of record for your store.
What Is a System of Record?
The System of record will determine how product data is shared between the two and which one has the last word if there are differences between the two.
The system of record is important when you change or update the products.
Product changes based on orders such as inventory changes are not affected by this. Even if Square is the system of record, when an order comes in via your WooCommerce store, the inventory on Square will be updated as well.
The system of record is the environment where you should make changes to the product’s features such as name, description and image.
- If you sell via multiple channels (e.g. in-person with Square POS and online), we recommend setting Square as your system of record. Using Square as the system of record is especially helpful if inventory is shared between Square locations. In this case, WooCommerce Products will be overwritten with data from the Square product catalog.
- If you sell online only, we recommend setting WooCommerce as your system of record. This will ensure basic WooCommerce product data is pushed to Square as it is change on your site.
- The option to Do not sync product data is useful when using Square as a payment gateway only, in which case product syncing is not required.
How to Enable Syncing
To share product information & inventory between Square and WooCommerce, you must enable syncing for that product by following the steps below:
- Go to Products.
- Select the product in question.
- Enable the Sync with Square setting. This is only available for products with a single attribute and a SKU, this is how products are matched between Square and WooCommerce.
- Click Update.

To update syncing for multiple products at the same time:
- Go to Products.
- Check the products you want to update.
- From the Bulk Actions menu, select “Edit”.
- Update the Sync with Square? field to “Yes”.
- Click Update.
Square as System of Record
When Square is the system of record, your products in WooCommerce will be overwritten with data from your Square products for the following fields:
- Product name
- Product price
- Product description
- Product category
- Inventory count (if inventory sync is enabled)
- Product image, if an image is not set in WooCommerce
Square will automatically sync information with WooCommerce approximately every 60 minutes. You can also run a manual sync any time. In both cases, Square will:
- Update synced WooCommerce products to reflect changes made to Square products with matching SKUs.
- Hide synced WooCommerce products when the SKUs are missing or were deleted from Square if the Handle missing products setting is enabled. If this setting is disabled, no action will be taken against missing products beyond a notification in the Sync records section.
As of version 2.0 +, neither automatic nor manual updates will import new products from Square to WooCommerce. If you have created new products and wish to import them to your WooCommerce store, please use the option to Import Products as mentioned above under Square settings.
When Square is the system of record, you should avoid changing product data in WooCommerce (manually or otherwise) as these updates could be overwritten by the data in Square during the next automatic sync.
WooCommerce as System of Record
When WooCommerce is designated as the system of record, the Square product catalog will be overwritten with data from the WooCommerce Products list for the following fields:
- Product name
- Product price
- Inventory count (if inventory sync is enabled)
- Product category (see note below)
- Product image
Note: Square allows one category per product, so if your synced product has multiple categories and sub-categories in WooCommerce, only the first or parent category will be sent to Square.
The plugin will send updated information from WooCommerce to Square whenever you make a change to a synced product via manual edit in WooCommerce, import, or API. You can also run a manual sync any time. In both cases, WooCommerce will:
- Update Square products to reflect changes made to synced WooCommerce products with matching SKUs.
- Create a new Square product when a synced WooCommerce product doesn’t have a matching SKU in Square.
- Remove the location from the Square product when a synced WooCommerce product with a matching SKU is deleted from WooCommerce.
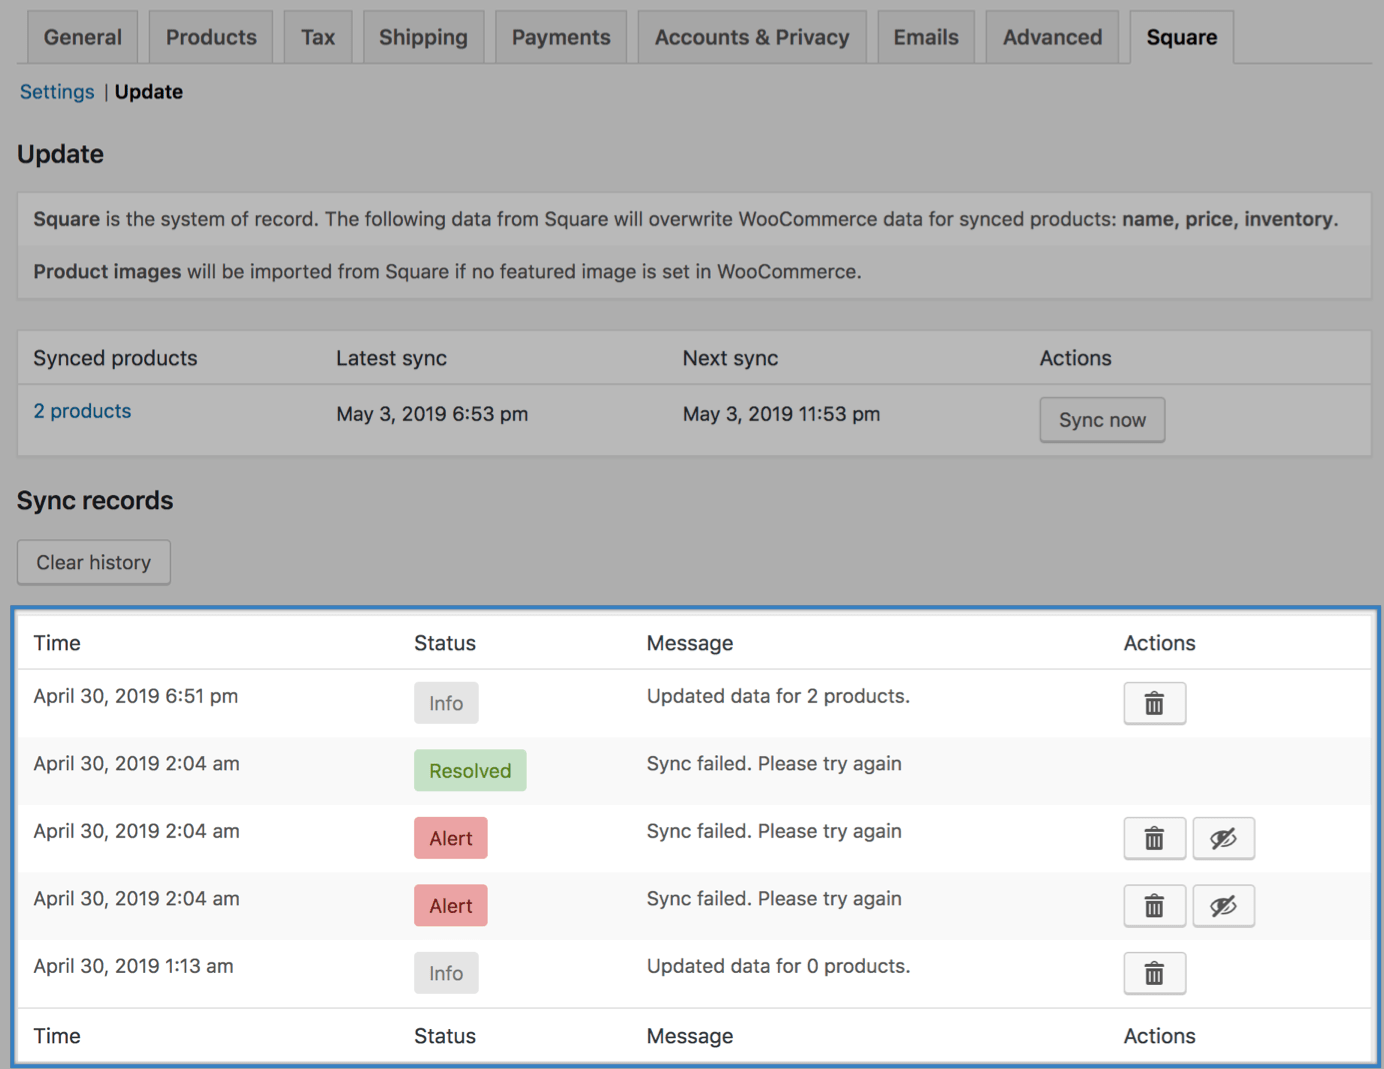
Manually Sync Products and Inventory
You can run a manual sync any time to ensure records match between Square and WooCommerce. To run a manual sync:
- Go to WooCommerce > Settings > Square.
- Go to the Update tab.
- Click Sync Now.
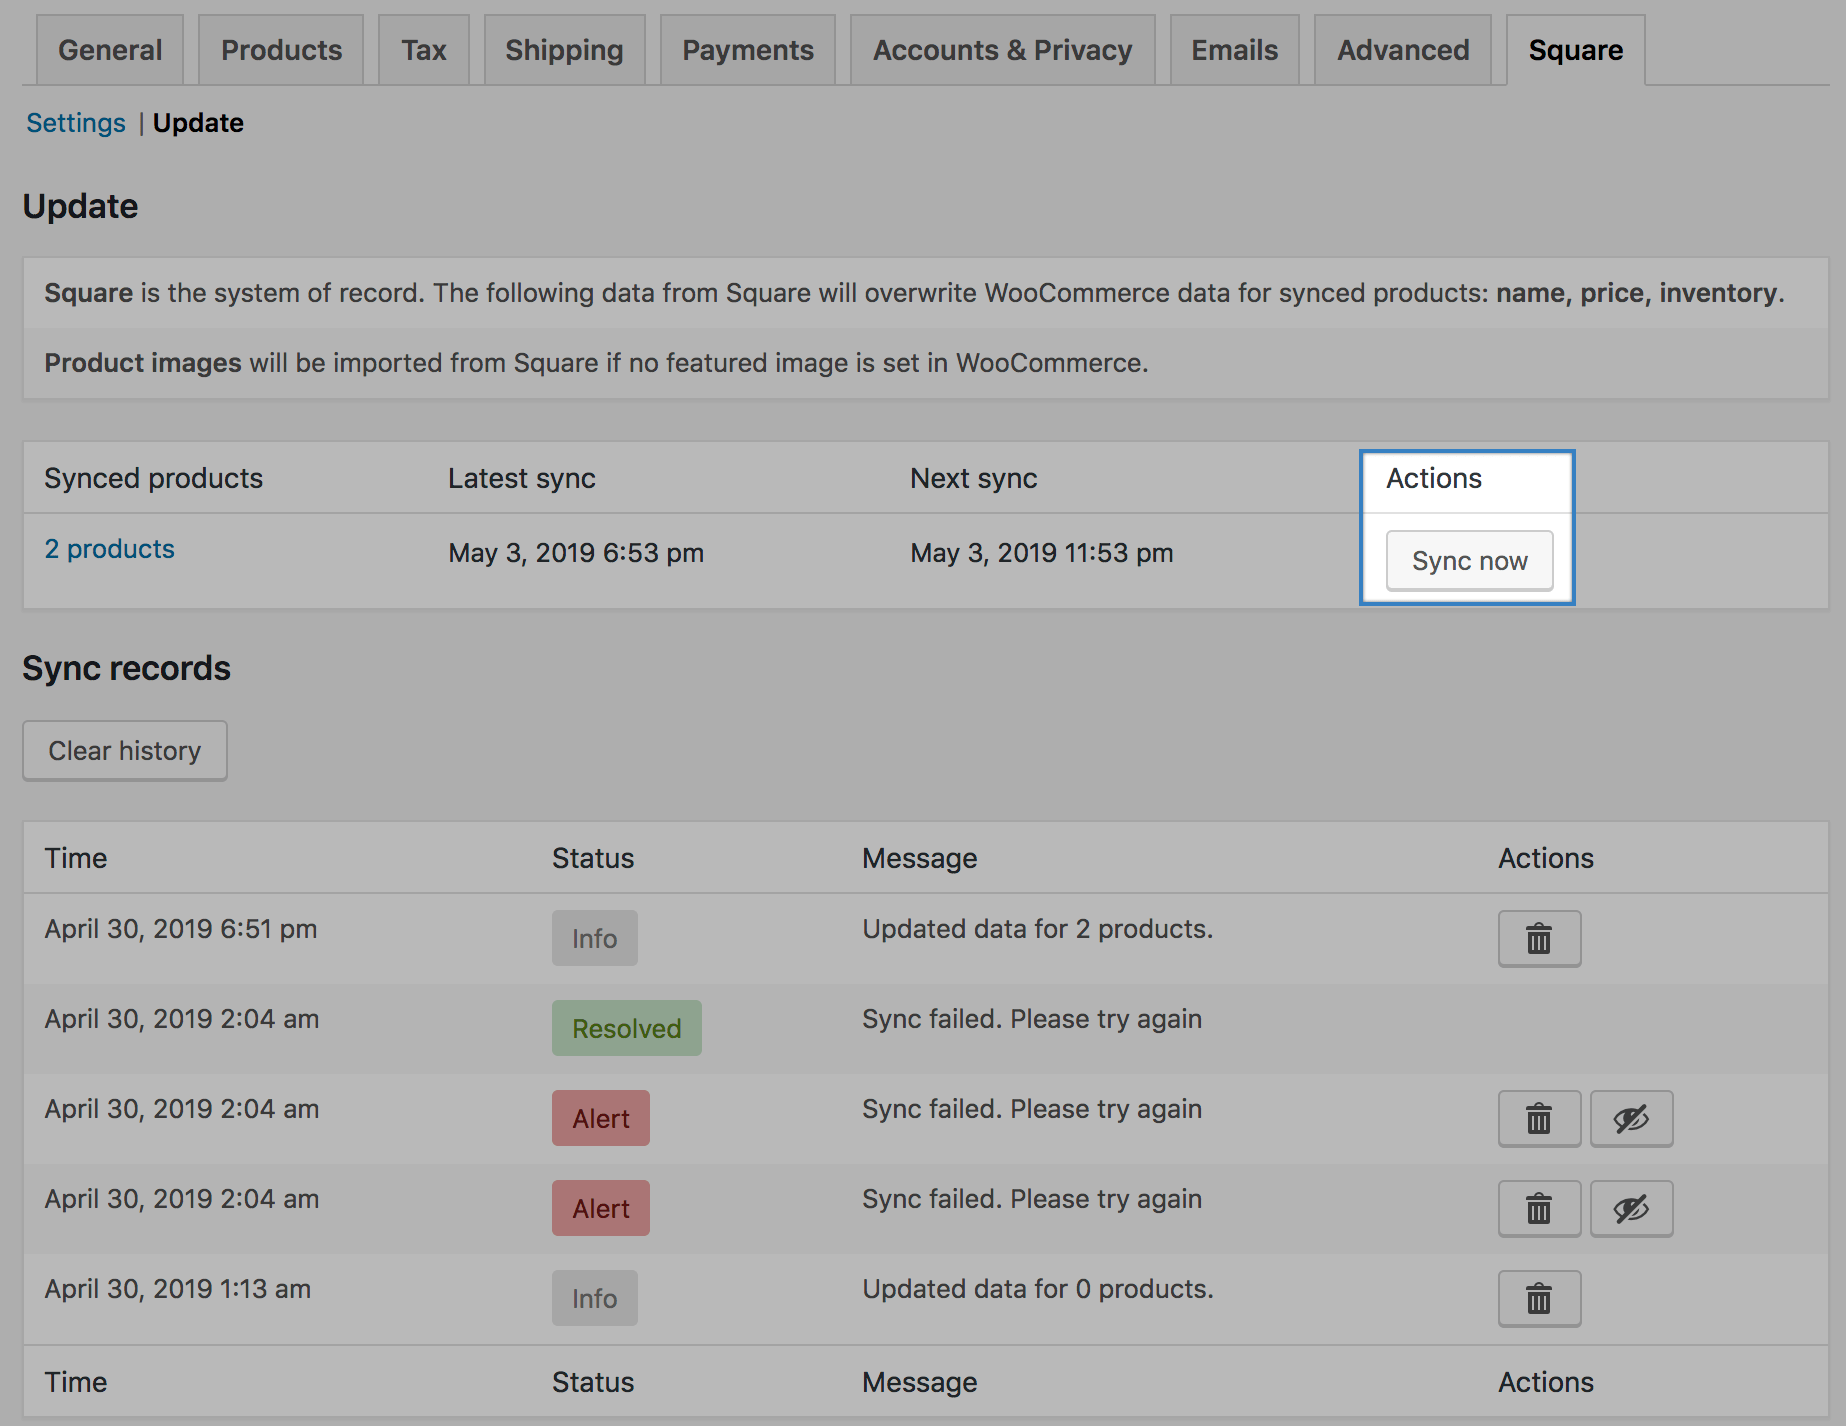
The sync results will appear in the Sync records section. If you have enabled the Square sync completed email, any listed recipients will receive an email once the manual sync is complete. Alerts identify any issues with the sync that require your review. You can take the following actions against Alerts:
- Delete: Remove the alert from the list.
- Ignore: Ignore the alert without removing it from the list.
- Unlink: Disable syncing for this product.
Sync Email
For businesses with many products, syncing can take some time. You can enable the Square sync completed email to notify you when a manual sync is complete. Follow the steps below to set up this email:
- Go to WooCommerce > Settings > Emails.
- Select Square sync completed.
- Check the Enable box.
- Enter one or more recipients for this email. By default, it will be delivered to the WordPress admin email as defined in Settings > General.
- Click Save changes.